|
Webcams at
mybitoftheplanet - 2008
During the ninth year of
webcams from mybitoftheplanet, as usual the webcam was being run from my old
Toshiba laptop (Win98).
After the webcam monitored the
successful nesting by Great Tits and Starlings, disappointment followed when
the House Martins failed to return to us - hopefully they will be back in
2009. Also, while Swifts nested successfully in my neighbour's roof , our
Swift boxes remained unused. Next year I will be using a CD of Swift calls
to try and attract them into the boxes.
While the webcams are now
switched off, below you can see information about the arrangements that I
used this year
..................................................................................................................................
The Nestboxes and their Cameras
In the way of an introduction to the webcams, below are brief
descriptions of the camera-equipped nestboxes that I have set up around my
home, and which may feature in the webcam(s) during this year' nesting
season -
The
Cameras
I have cameras installed in eight nest boxes
for 2008 - 3 House Martin nests (plus an external camera), 2 Swift nests, 2
Starling nests and my Blue/Great Tit nestbox. I have decided not to use one
in my Robin box this year, and I do not have any cameras in my House Sparrow
terraces.

The
cameras used this year are EM120 Black and white cameras (on the right in
this picture), chosen for their very low light level capability (0.4lux),
and EM220 colour
cameras. The B/W cameras have built in microphones.
The cameras have lenses of several focal lengths (mentioned in the notes
below).
All the cameras are 'hard-wired' to multiplexer units next to my
computer. These units provide me with the quad images that will sometimes
appear on the webcam. Both my main PC and my Toshiba laptop use WinTV
devices to input from single sources, although I can select feed from any of
the ten cameras individually or any combination of four of them for each
computer.
Below are brief descriptions of the
camera-equipped boxes -
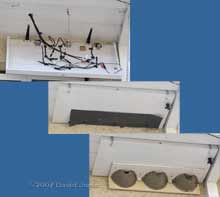
The Blue/Great Tit nestbox
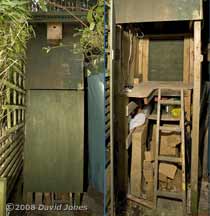
This
is the oldest of my nestboxes, having been constructed around 1990. It is a
purpose-made tower built to allow for photography at the nest, and the nest
entrance is about 8ft above ground level, and faces East.
The right hand image shows the platform that I can stand on, and in the
shadows above it you can just make out the position of a bench seat.
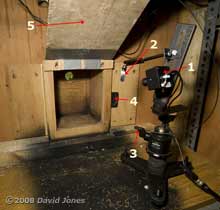
The 'business end' of the box is shown here. The camera (labelled 1) is
one of two EM220 colour cameras (both with 2.9mm lenses) being used this
year for the first time, the other inside the nestbox, giving a vertical
view.
In front of the camera a support holds in place a pair of crossed
Polarising filters (labelled 2) which act as a 'blinker' between the camera
and the bright light of the nest entrance - this is particularly important
in the mornings.
Label 4 indicated a tape flap attached to the edge of a glass sheet. The
glass can be removed for cleaning or access by sliding to either side.
When there is a nest present a second sheet of glass can be slid in to
replace a soiled one without creating any gap at the back of the nestbox.
Above the box, a plywood baffle (labelled 5) hides a curved diffuser
which protrudes into the box. This houses a small tungsten light bulb (which
is on permanently). Resting on the baffle so that its light is directed
through the diffuser is an old Vivitar 2500 Thyristor flashgun. I have
replaced the batteries in this with a lead that goes down to a separate
battery pack situated on the platform shown in the first picture. This
allows me to turn the flash on/off remotely. The flashgun uses a sensor to
control its light output and I'm using a length of fibre optic cable to
enable the sensor to operate in this set up the end of the cable is labelled
3 in the picture.
The whole area seen in the photograph is normally hidden behind a black
fabric screen which has a slit cut in it though while I can watch and take
photographs.
In addition to the very dim tungsten lighting, two banks of white LEDs
are used to illuminate the box during daylight hours. These are controlled
by a timer/dimmer arrangement that I have assembled so that during the hours
of darkness the webcam image will become dimmer.
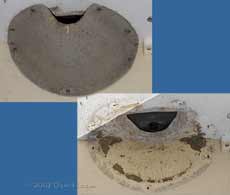
The Starling Boxes
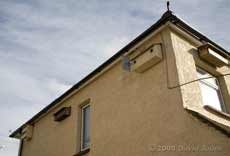 These
consist of
a pair of nestboxes
high on the North facing wall of my house.
Originally positioned half way along the wall,
I moved them to the rear corner of the house after we had trouble with the
Starlings attacking Swifts in 2007. The metal screen that sticks out at the
left of the box was part of my attempt to block the Starlings' view of the
front of the driveway where the Swift activity takes place.
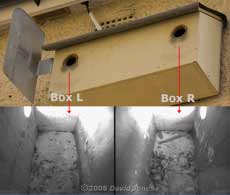
Each of the nest chambers has a floor area
of 17x27cm, and there is a camera in each, attached to the central
partition, just over 20cm above floor level.
The boxes are illuminated day and night by red LEDs, their brightness
greatly limited by the use of resistors. The Starlings seen to completely
ignore them but next year I will be replacing them with proper infra-red
LEDs.
The House Martin Nests
Our three artificial House Martin nests
were constructed using fibreglass as a skeleton which was then covered with a
mixture of sawdust, soil and cement. Originally put up about ten years
or so ago, they were not used until 2004, when we first saw House Martins
working on one of them in the middle of August. In 2005-6 they returned
producing two broods each summer, and staying with us until well into
September.
After that season I
carried out a major reconstruction to include cameras in all three nests
ready for 2007. Sadly, bad weather caused the failure of the Martins' brood
just days before they were due to fledge.
I have created a false panel above the
nests to include the cameras and their links, and which can be hinged down
for access (joists in the loft prevent access from above).
A black neoprene rubber sheet acts as a
seal around each lens to reduce access for the wandering parasites.
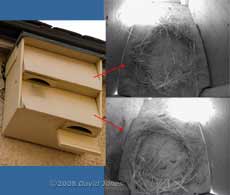
This image gives a closer view of the camera
position of each nest.
Once final adjustments are complete I use
mud to coat the rubber sheeting and to seal around the rim of the nest, as
the Martins have done previously.
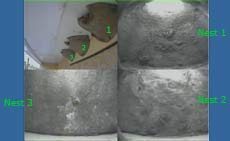
These are the images that the cameras
provide. The camera in nest 1 has
a 2.1mm lens, giving the widest view, nest 2 has a 2.5mm lens, and nest 3 a 2.9mm lens
(which I will probably replace with a 2.5mm lens for 2009). The external
colour camera has a 3.6mm lens.
Prior to the 2008 nesting season I installed infra-red LEDs in all three
boxes, and gave the boxes a fresh coating of mud!
The Swift Boxes
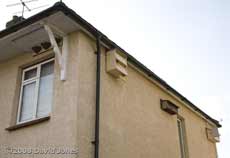 The Swift boxes are situated on the same,
north-facing wall of the house, but in the north-east corner, giving
prospective users a clear approach pathway. The Swift boxes are situated on the same,
north-facing wall of the house, but in the north-east corner, giving
prospective users a clear approach pathway.
Over the previous two years
there have been Swifts nesting in the loft of our neighbour's house, just
12ft away across our shared driveway, so I am optimistic that at
some point the boxes will be discovered. In 2008 I hope to use a recording
of Swift calls to help in this effort, the loudspeaker positioned behind the
ventilation brick you can see to the left of the boxes.
 The entrances comply to the BTO
recommendation and measure 130mm by 30mm. Originally they had rectangular
entrances, but these proved too much of a temptation to the Starlings. The entrances comply to the BTO
recommendation and measure 130mm by 30mm. Originally they had rectangular
entrances, but these proved too much of a temptation to the Starlings.
Each nest has a floor space of about
27.5x20cm and the cameras are located above the slightly raised nesting
areas
Both boxes are illuminated with infra-red LEDs.
|