Canon 20D & 5D Digital SLRs
An Introduction
The Olympus 2100UZ was a great tool in the keeping of my diaries. However there were two main short-comings that needed to be recognized. First, the methods I used for close-ups had limits that often left me frustrated. Secondly, while the 2mp picture files produced excellent images and I was able to sell a few of my photographs during the last couple of years, the limited print size possible with the file size was a bit restrictive. The need to move on finally became apparent when the camera started to show signs of old age (or perhaps excessive use!), including the failure of the return spring on the focusing/shutter button.
The Olympus E-20 was of limited use for my work in the garden because the methods I had used with the 2100UZ to do macro work simply didn't work on it. Despite this it is a good camera for general landscape type work and its almost silent shutter is an advantage for nest box photography.
In December 2004 I decided to return to the use of an SLR and bought a Canon 20D digital SLR, an 8.2mp camera that accepts EOS lenses and which could be adapted to accept my old Canon macro kit.
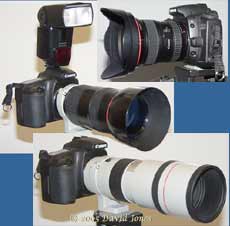
This image shows three of the lens that I now have. From the top, they are the 17-40mm 1:4 L USM lens, an 80-200mm 1:2.8 L lens, and at the bottom a 300mm 1:4 L USM lens.
The two telephoto lenses are in constant use for wildlife photography in the garden. To extend them I have a Kenko 2X converter, and will be getting a 1.4X converter in the near future.
Also shown is a 580EX flashgun.
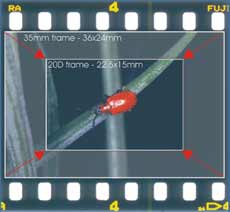
The designations of these lenses are based on their use on a 35mm format camera. However, the 20Ds sensor size (22.5x15mm) is smaller than a 35mm film frame (36x24mm) by a factor of 1.6. The illustration shows the difference.
This means that the 20D 'sees' a cropped image compared with the 35mm frame. If the same lens is used on both the 20D and a film based camera, the image of the beetle will be exactly the same size on both film and sensor.
The difference in size between the sensor and 35mm film has led to the application of the sensor size factor to the focal lengths of lenses. For example, the 300mm lens is regarded as effectively being a 480mm (300mm x 1.6) lens when used on the 20D, even though its focal length doesn't really change.
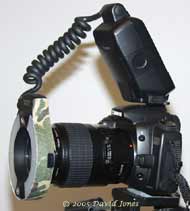
For close-up work, down to a magnification of 1:1 I have a 100mm 1:2.8 USM macro lens, shown here with a MR-14EX ring flash.
I can get closer than 1:1 by using a set of Kenko extension rings.
 I
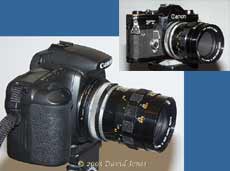
first used a Canon macro lens back in 1970 when I had a Canon FT camera
and a Canon FL 50mm macro lens (top right image).
I
first used a Canon macro lens back in 1970 when I had a Canon FT camera
and a Canon FL 50mm macro lens (top right image).
The lens can be used on the 20D by using a EOS-FD macro adaptor ring. The ring acts as a short extension tube and, as a result the lens cannot be focused on distant subjects. Also, it has to be used completely manually, just as it was on the original camera.
This lens experienced an interesting episode soon after I bought it. Sheila and I were teaching in the Bahamas at the time, and the lens was accidentally dropped into several feet of warm Bahamian sea water while we were rushing to change lenses in order to photograph an octopus. It took me all day to wash out all the salt water and to dry it completely - and it still works perfectly today! I don't think that you could hope to do that with a modern lens. Needless to say, the Octopus left without getting its photograph taken.
Although it isn't pictured here, I also have an excellent Vivitar Series 1 105mm 1:2.5 macro lens which can also be attached to the 20D via the same adaptor.
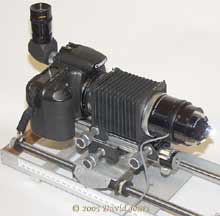
Another piece of equipment that heralds from that time is my Bellows FL,
which has now come out of retirement.
The 20D can be attached to it using the EOS-FD macro
adaptor. The 50mm macro lens pictured above can be used on this bellows,
but this picture shows a specialist bellows lens mounted instead.
This is a Canon Macro Photo lens 20mm 1:3.5. When used
with the bellows it can provided magnifications in excess of 10:1.
I have made a special mount for it that uses three white LEDs to aid in focusing, and allows for the ring flash to be attached.
As well as this lens, I can also use the bellows with the enlarger lenses described in the section about the Olympus 2100UZ.
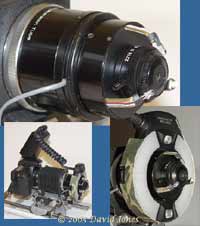
I have since added another bellows - the Canon Autobellows. This was designed by Canon to use with their FD range of lenses and is sturdier than the FL bellows.
A useful extra for this bellows was the Macro Stage which you can see in this photograph. If the bellows is mounted on a tripod so that the stage is clear of the surface then back lighting can be provided through the translucent base.
To the stage I've added a mechanical stage device from a microscope to enable me to make controlled adjustments to the positioning of objects under the lens. Fitted into this is a white Perspex 'slide' that can be rotated to adjust the alignment of any object I'm photographing ( the camera can also be rotated through 90 degrees in its mount at the top of the bellows).
Using this arrangement has a serious limitation. To refocus the lens I either need to alter the distance between the two ends of the bellows which will alter the magnification factor, or I need to more both ends independently but in unison if I an trying to maintain a constant magnification.
24 October -
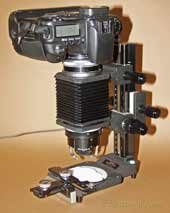
In 2006 I decided to buy another tool for macro work, the Canon MP-E 65mm macro lens. This is a manual focus lens specifically designed for true macro work from magnifications from x1 to x5 without the need for tubes or bellows.
It is a fantastic lens for that work, although you have to remember that at maximum magnification the lens becomes very long (lower image) and the working distance between the front of the lens and the focal plane is just 41mm, and when the bellows is fitted this distance becomes nearer 20mm!
While it may be about the best macro lens available, I feel that its front end could have been a bit more 'friendly'. As the front element is relatively small, the front end of the lens could have been slightly tapered, with the ringflash mount set back slightly to increase the effective working distance.
9 November 2006 -
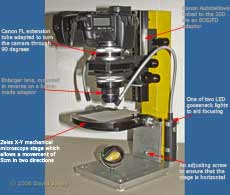
To overcome the problem with the Canon macro stage that I described above, I have made a new macro stage based on a Zeiss X-Y mechanical microscope stage. This is a large stage that allows movement of up to 5cm and 7.5cm in the X and Y directions respectively.
I've mounted it to a suitably sturdy frame, with three mounting heights for the bellows, and with sufficient space under it to experiment with back-lighting of objects.
The goose-neck LED lights were bought from Lidl and are ideal to aid focusing. At some point I will be replacing their batteries with a low voltage unit.
The picture shows the macro stage in its 'raw' stage with a cardboard mock-up of a platform on which objects will be placed. It is possible to use the set-up tipped over so that the stage is vertical, and I will be making a platform that incorporates a small container for liquids, including pond water.
14 November 2006 - Since that last update I have now made three sub-stages to use with the Zeiss stage - The beauty of this stage is that I only need to undo two thumb screws to remove the sub-stage and replace it, or to set something up on it away from the main stage.
 The
first was a simple acrylic shape which I haven't photographed, but which
forms the pattern on which the second, shown here, was made.
The
first was a simple acrylic shape which I haven't photographed, but which
forms the pattern on which the second, shown here, was made.
In this sub-stage I have provided a frame to accept the glass from a 2¼ inch (photo) slide mount. The glass can be removed for cleaning, or it could be replaced if required with squares of other other materials such as translucent acrylic.
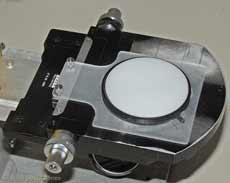 The
other sub-stage that I have constructed is based on an old 72mm polarizing
filter. Polarizing filter rings have two components, one ring that screws
into place at the front of a lens, and a second ring, holding the filter,
that is free to rotate. Unusually for polarizing filters, this one has a
small prong sticking out of the rotating ring which makes it easy to turn.
The
other sub-stage that I have constructed is based on an old 72mm polarizing
filter. Polarizing filter rings have two components, one ring that screws
into place at the front of a lens, and a second ring, holding the filter,
that is free to rotate. Unusually for polarizing filters, this one has a
small prong sticking out of the rotating ring which makes it easy to turn.
The screw thread of the filter is bonded into a suitable hole cut into the acrylic base. The filter has been removed and a disc of translucent acrylic put into its place.
As with the previous sub-stage, this disc can be replaced with clear glass, etc, or even a polarizing filter.
 This
rotating stage means that, along with the X-Y movements of the Zeiss
stage, being able to rotate objects allows me to be more precise in the
way I position them under the lens.
This
rotating stage means that, along with the X-Y movements of the Zeiss
stage, being able to rotate objects allows me to be more precise in the
way I position them under the lens.
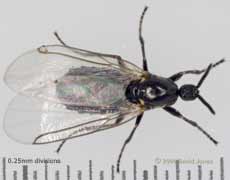
This live fly was contained under glass within a circular space on the stage, and the arrangement greatly simplified the task of positioning etc. so that it would fill the image frame in the camera. The smooth movement of the stage also meant that the fly was less likely to be disturbed as I prepared to take the photograph.
The scale was photographed separately at the same magnification. I intend to glue a scale down one side of each sub-stage so that it is always available. (For the large image of this fly go to the garden diary entry for 14 November 2006.)
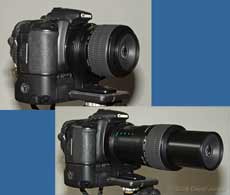
3 April 2007 - A month or so ago I added a Canon 5D digital camera to my equipment. A full-frame camera, it can utilize all my existing lenses and other equipment described above.
The decision to buy it came from a couple of considerations. First, while the Canon 20D is an excellent camera, I was often frustrated by having the wrong lens fitted at the wrong moment, with the consequence of losing photographs. This led to the decision to buy a second body. I choose the 5D, partly because of the improved performance it would provide, especially when using the 65mm MP-E lens, and also I was able to get a deal that I could not refuse (including a 24-105mm f4 L IS lens)!
I have been very glad that I made that choice, and regard the 5D very much as a camera to complement the 20D rather than one to replace it. Now, I will often wander around the garden with both cameras, the 20D fitted with the 100mm macro and the MP-E on the 5D. When set up like this I use the MR-14EX ringflash on the 5D, and my old Macro Lite ML-2 ringflash (from my T90 days) on the 20D. The ML-2 has to have a couple of contact pins taped over so that I can use it in manual mode as it was designed for T90 use only. Despite that limitation, it works very well.
8 March 2009 - I've been very happy with my existing set of lenses apart from one problem. I have often found that my 300mm f/4 lens has been somewhat restricting in that its aperture is a bit too small to cope with the shady conditions that we experience in the garden, especially through Autumn to Spring. Also, the f/4 aperture is not a good starting point when you want to add tele-converters to give longer focal lengths.
 Modern
long telephoto lenses, with their auto focus and image stabilization are
great, but incredibly expensive, so I decided to do a bit of photographic
'time travel' and revert back to a manual focus lens. To this end I've
bought myself a Nikon 300mm f/2.8 AS-IFn lens. This was the last manual
version of this lens made by Nikon and dates from around 1992, and one of
the improvements this boasted over previous versions was that it can focus
down to 3metres as opposed to the 4metres of previous versions.
Modern
long telephoto lenses, with their auto focus and image stabilization are
great, but incredibly expensive, so I decided to do a bit of photographic
'time travel' and revert back to a manual focus lens. To this end I've
bought myself a Nikon 300mm f/2.8 AS-IFn lens. This was the last manual
version of this lens made by Nikon and dates from around 1992, and one of
the improvements this boasted over previous versions was that it can focus
down to 3metres as opposed to the 4metres of previous versions.
An adaptor allows me to use it on my EOS cameras.
It's in great condition and my first impressions have been extremely positive. OK, it doesn't have autofocus. That doesn't worry me. I have used manual lenses since the 1960's, and anyway I often switch AF off on the other lenses I use at present. Modern long telephoto lenses nearly all have image stabilization, but at a price that is out of my reach (this lens cost about a sixth of one of those), and as I will nearly always use it on a decent tripod, it is the large aperture that has priority over IS.
Why a Nikon lens? When Canon made the switch to their EOS auto-focus cameras they decided to make what was a clean break with the older FD lens system. The 'new' camera bodies had a new lens mount system which included a greater separation between the lens mount and the film (or sensor in the digital cameras). If you wanted to maintain the ability to focus to infinity you could not use the old FD lenses on the EOS cameras without the used of an adaptor that included a correction lens. Canon only made very small numbers of these adaptors and these days they are incredibly expensive. There are cheap alternatives but I have not read a single good comment about them, which brings me back to the Nikon lens. The adaptor for a Nikon lens (as well as those for some other makers) does not need any corrective optics and so there is no extra glass introduced to reduce image quality. In the case of this particular lens that quality is very high indeed, and with no electronics to worry about, it is quite feasible that the lens could outlive my cameras!
One thing to note about the adaptor is that I understand it doesn't actually place the lens at exactly the correct distance from the sensor. The lens-sensor distance becomes slightly longer than it would when mounted on a Nikon camera. This means that the adaptor acts as a very thin extension tube. Using an extension tube with a lens has three effects. First, it can result in the lens no longer focusing at infinity. However, as this particular lens is deliberately designed to focus past infinity the problem does not arise in normal use. The second effect of using an extension tube is that the lens will focus closer than when used on its own. I've checked the lens and I find that its closest focusing distance is 2.95m so the adaptor plate is having a minimal effect. The third effect of using an extension tube is that the effective aperture is reduced, so that instead of being f/2.8 it is actually marginally smaller. By how much I cannot tell without testing with comparing meter readings with other lenses, or using an exposure meter - something I shall leave for another time.
5 January 2011 - A tabletop arrangement for use with my 5D and the MP-E 65mm lens.
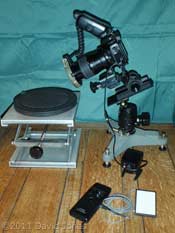
The lens has proved to be an invaluable asset since I first bought it back in 2006, and I have more often than not used it hand-held when taking insect photographs in the garden.
However, at this time of the year I'm more likely to bring specimens indoors to record them, and I have been trying to improve my tabletop arrangement. These notes show the current set-up, as seen here.
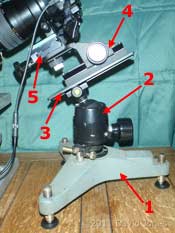 Rather
than relying on a regular small photographic tripod I have turned to a
heavy, cast iron tripod (1) removed from a bit of long obsolete scientific
equipment. On it I have mounted a large ball head (2) made by Kennett
Engineering Ltd (precursor of Benbo Tripods) & fitted with an Arca Swiss
type quick release clamp (3).
Rather
than relying on a regular small photographic tripod I have turned to a
heavy, cast iron tripod (1) removed from a bit of long obsolete scientific
equipment. On it I have mounted a large ball head (2) made by Kennett
Engineering Ltd (precursor of Benbo Tripods) & fitted with an Arca Swiss
type quick release clamp (3).
Above that is a massive focusing rail (4) made by Canon. It too is equipped with an Arca QR clamp (5), mounted at right angles to the lower clamp.
With camera and lens in place the whole arrangement weighs almost 10kg, providing a very stable platform for photography at up to 5x magnification.

The tripod has screw feet that can be adjusted if the tripod needs to be leveled. I stand the feet in the lids of old Kodak film containers. These prevent dents in the dining table(!) and also provide a low friction interface so that I can slide the arrangement over the table top if needed.
The old ball head cannot normally be rotated, but the tripod has a useful feature to provide this capability. If I undo screw A, the ball head/camera can be rotated freely. If screw A is retightened turning screw B will move the head, and so the camera, very precisely.
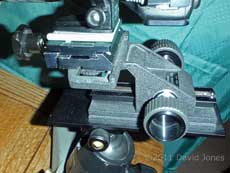 The
Canon focusing rail dates from the 1970's when it was used on a copying
stand. It has worm gearing and a locking wheel on the far side.
The
Canon focusing rail dates from the 1970's when it was used on a copying
stand. It has worm gearing and a locking wheel on the far side.
I have mounted the rail permanently onto a long Arca Swiss quick release plate. This allows for approximate positioning of the rail before accurate focusing is undertaken. Mounting the top QR clamp at right angles allows me to move the camera sideways a short distance should that be useful.
The camera is attached to this top clamp via a QR plate mounted on the lens collar rather than the camera itself, which means that I can rotate the camera when framing the image.
All the bits describe so far have been in use for some time now, but shortly before Christmas I acquired a few more pieces of kit that have greatly enhanced the set-up. First, two Laboratory jacks (lab jacks). The first time I used one of these I had to wonder why I hadn't bought one a long time ago.
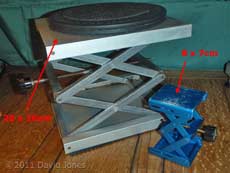 The
large one is ideal for positioning small logs precisely in the vertical
axis.
The
large one is ideal for positioning small logs precisely in the vertical
axis.
In this picture you can see a rotating stand on it, but I also have an X-Y stage rescued from an old microfiche viewer. This can be bolted on top of the stage to allow me three axes of movement (although this is not robust enough for. heavier logs. The stage itself will happily cope with loads of up to 30kg.
The small lab jack is more or less 'pocket-sized' and will be useful for a light-weight set-up when we are on holiday.
An essential part of the present arrangement has to be the remote release. While I have cable releases I prefer wireless releases as there is no chance that I will accidentally put tension on the cable at the wrong moment.
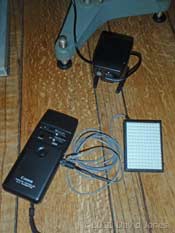 My
most recent acquisition is another obsolete piece of Canon equipment, an
LC-3 wireless controller. It is out-dated because it uses the older T3
connector used on EOS film cameras. Conveniently, the one I bought came
complete with a T3/N3 adaptor cable which means that I could plug it into
the 5D.
My
most recent acquisition is another obsolete piece of Canon equipment, an
LC-3 wireless controller. It is out-dated because it uses the older T3
connector used on EOS film cameras. Conveniently, the one I bought came
complete with a T3/N3 adaptor cable which means that I could plug it into
the 5D.
One nice feature of the transmitter is that it has a T3 socket mounted on one side so that you can attach another remote to it.
I have used the plug from an old T3 type remote to connect a foot switch. This leaves both hands free to manoeuvre the camera - useful when I am 'chasing' a small, active insect.
I know that I could bypass the LC-3 completely, but including it means that should I (or someone else) trip over the foot switch cable it will be just the transmitter that ends up on the floor!
16 January - Setting up an infrared beam camera trap
From time to time I use a cctv camera to monitor night-time activity in my garden, especially on my veranda. However, the images captured from the recordings made with my cameras are always less clear than I would like. Ideally I want to carry out this task with a still camera, but while I've experimented with making up various (simple) electronic arrangements, the acquisition of the Canon LC-3 controller has made the whole process a lot simpler.
This first picture shows the arrangement that I used last night in order to establish whether or not, and when a fox is visiting the veranda.
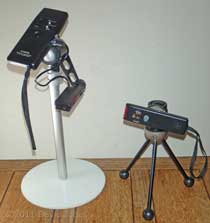
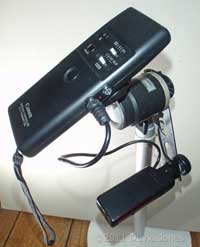
On the right, mounted on a Novoflex BasicBall (a very useful bit of kit in its own right) is the transmitter of a Canon LC-2 Wireless Controller. This controller has a limited range of just 5 metres but can be set up to provide an infra-red beam which has to be broken to trigger the camera shutter. It is the only Canon controller that provides this facility.
On the right, the LC-2 receiver is mounted so that its sensor points towards the transmitter. In practice these units were at opposite ends of my veranda, about 2.5m apart.
The receiver is plugged into the T3 socket on the transmitter of my LC-3 Controller, and using a ball head, this is in turn pointed towards the LC-3 receiver which is connected to my camera, mounted high on a tripod inside my house.
While the distance to the camera was only around 3m in this case, the LC-3 has a range of up to 100m, and I have confirmed that the arrangement could be set up at the other end of my garden.
If you are familiar with the LC-2 controller, you will notice that on the receiver shown here there is a small addition to its red front. The photo-transistor originally fitted to the receiver had an intermittent fault and I replaced it with one of a different shape, needing to drill a hole in the red cover to accommodate it.
The length of time that the above combination can be used for is of course dependent on the state of the batteries used, and it is the LC-2 that provides the limiting factor . Both parts of the LC-3 use AA batteries, and can operate for up to 250 hours, so they are ideal for prolonged monitoring use. The LC-2 uses AA batteries in the transmitter and a 4LR44 (6 volt) battery in the receiver, and the instructions state that these will last for 5000 operations. However, when used in the continuous beam mode (Auto sensing) battery life for the LC-2 varies from 18 hours if the beam is no more than 3m but just 4 hours when used at its maximum range of around 5m. I use rechargeable AA batteries, so it is only the 4LR44 battery that I have to buy spares for.
....More to be added as time goes by!