Dealing with 'sticky' buttons on a KH-830 Knitting Machine
Sheila's KH-830 knitting machine had been in storage for a long time, and when she decided to use it again she found a sticky button problem on the main bed carriage (K carriage). What she found was that when the two tuck stitch cam buttons were pressed in, the two skip stitch buttons also went in, and vice versa.
We spent a lot of time soaking the carriage with WD40, and eventually we freed up one of the buttons but the other resisted, so I decided to investigate further, rather than resort to the repair man. This is what I did:
1 - removing the handle
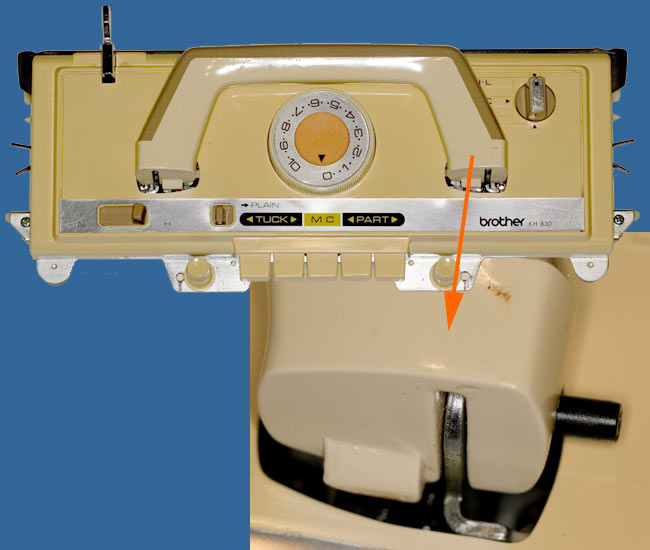
Lay the handle down so that it is not under tension, then use a 1pt cross-headed (or posidrive) screwdriver to remove the two screws that hold it in place. Put the handle and screws safely to one side.
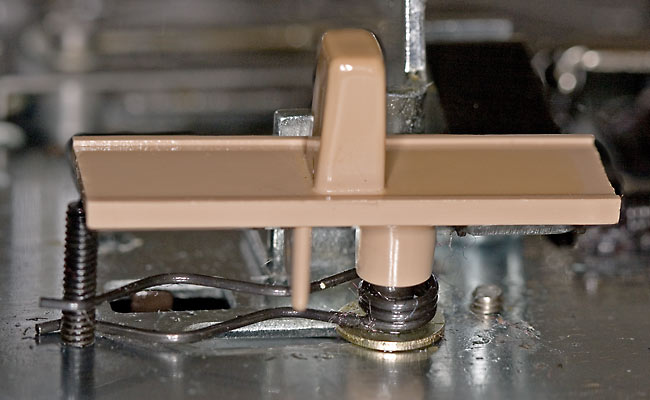
2 - removing the tension dial
Before proceeding further I made sure that the tension dial was set to its minimum setting so that I could be sure to replace it in the same way later.
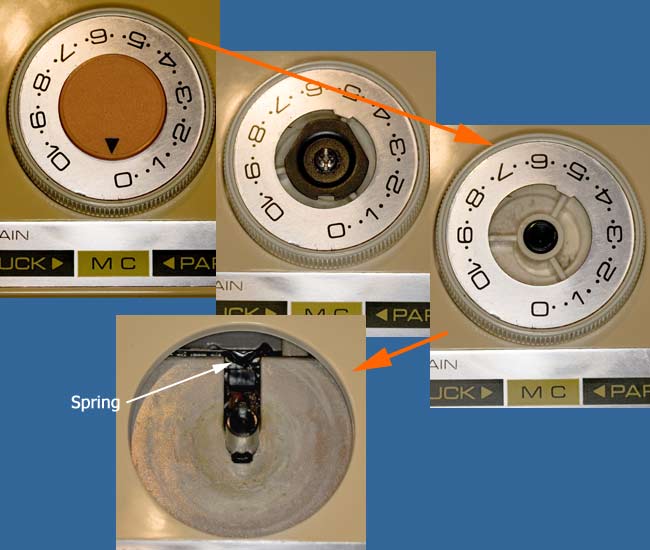
To remove the dial -
a - use a knife (with a rounded end and not sharp to avoid marking the plastic) to gentle prise off the central, orange coloured disc,
b - Note the position of the small metal plate that is held in place by the central screw, and then undo this,
c - lift the dial straight out. When you have done this, notice the spring (labeled above) that gives the click positions as the dial is rotated. The dial will need to re-engage this during re-assembly.
3 - Removing the cover
Before proceeding, note the position of the Change knob (at the back right-hand end of the carriage) just in case this falls off later (it is only held in place by the cover). Once you have done that, turn the carriage over:
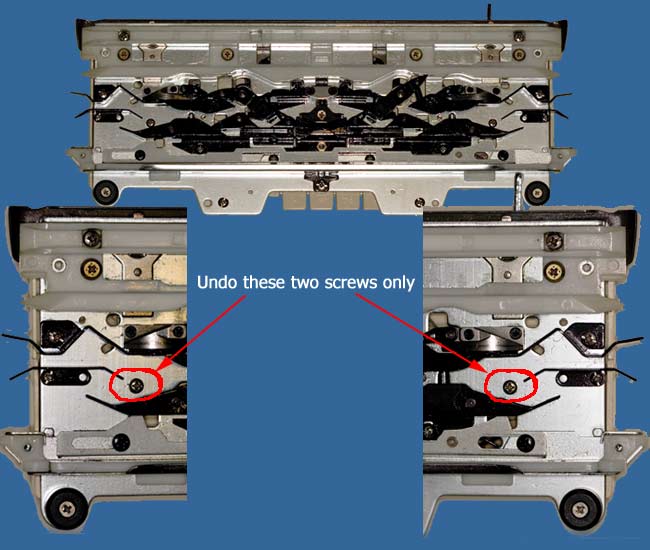
Having done steps 1 and 2 you need to remove just these two screws to free the cover. Hold onto the cover as you undo the screws and then turn it back over before removing it, manoeuvring it over the row counter tripper.
4 - The problem identified
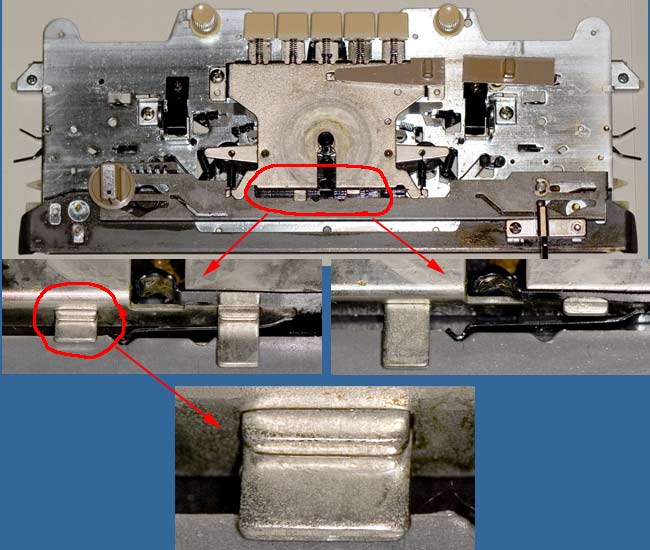
At the back of the metal plate that sits behind the row of buttons you can see four metal bars protruding. These are in two pairs, but each bar should move in or out independently according to which of the four tuck/skip stitch buttons is pressed at the front of the carriage.
In the case of Sheila's carriage the two bars of each pair had become stuck together, which meant that the buttons could no longer work independently. Lots of WD40 (*see bottom of page*) and repeated button pressing finally broke the bond between the right-hand pair of bars, but the free the left-hand pair I had to take a slightly more drastic measure (but not one that would do any damage to the mechanism!).
I simply put a sharp knife edge up to the join between the two bars( at the protruding ends) and used the handle of the screwdriver to give it a gentle tap. I needed to repeat this twice before the bars became unstuck. Once we were sure that the buttons now operated properly, we took advantage of the cover being off to remove fluff, and then thoroughly soaked the mechanism with WD40 to help remove the old oil deposits.
5 - Reassembly
When you are ready to replace the lid, you need to make sure that the Change knob is in the position you noted earlier.
Next, you need to ensure that the Holding Cam Lever is seated correctly:
If it has come off during the process, make sure that it is replaced in the way shown above, with the oddly shaped spring in place around the screw thread as shown (this gives the lever its two positions when in use). Also, as you replace the cover, check that the level is correctly aligned with the hole so that it moves easily.
Once you have got the cover in place, hold it securely as you turn the assemble over to replace the two screws (see step 3). Do not overtighten.
As you replace the tension dial, ensure that it is in the same position as when it was removed. As you push it into place, tilt it very slightly towards the back of the carriage to help it engage with the spring shown in step 3.
Replace the central screw so that the notch in the metal plate faces the front of the carriage, and pop on the orange cap.
Finally, replace the handle, with it down flat as you put in the screws.
As it turned out, what looked like a real problem turned out to be an easy one to solve, and without resorting to the professionals. Sheila was soon using the carriage again, and the machine is ready for serious action!
After a few days use I will open it up again and introduce some suitable grease to a few places.
WD40 - a warning
My use of WD40 has sparked off quite a discussion on knitting machine forums because its use as a lubricant is not recommended for knitting machines. I can fully understand this as, if left there, the film it leaves on surfaces will attract dust. However, when I dealt with the button problem, and as I didn't have any degreaser spray (and anyway, I'd be worried about the affect this might have on plastic parts), the use of a WD40 spray can allowed me to clear away a great deal of the old oil and fibres - the run-off was evidence of that.
I would be interested in alternatives that I could use in the future. Sheila tells me that in the US there is a product called Lori Lyn Machine Metal Lube that can be used for the same job - I would be interested to know what ingredients are listed on the can so that I can find a suitable equivalent here in the UK.
After the repair was carried out, Sheila used the machine to confirm that everything worked properly (which it did, other than the row counter, which has now also been dismantled, cleaned and is working again!). Now that she is satisfied that it is in working order I will be disassembling the carriage again to clean it again and then oil it properly with the recommended gun oil that she normally uses.
Any hints/tips as to suitable solvents etc available in the UK would be gratefully received by us, posted to
sheila@mybitoftheplanet.com or david@mybitoftheplanet.com
and you would also be welcome visitors to my garden wildlife diaries at